Lowell Grand Banks Dory Model with Tools

6 reviews

Price:
Sale price$65.95

Description

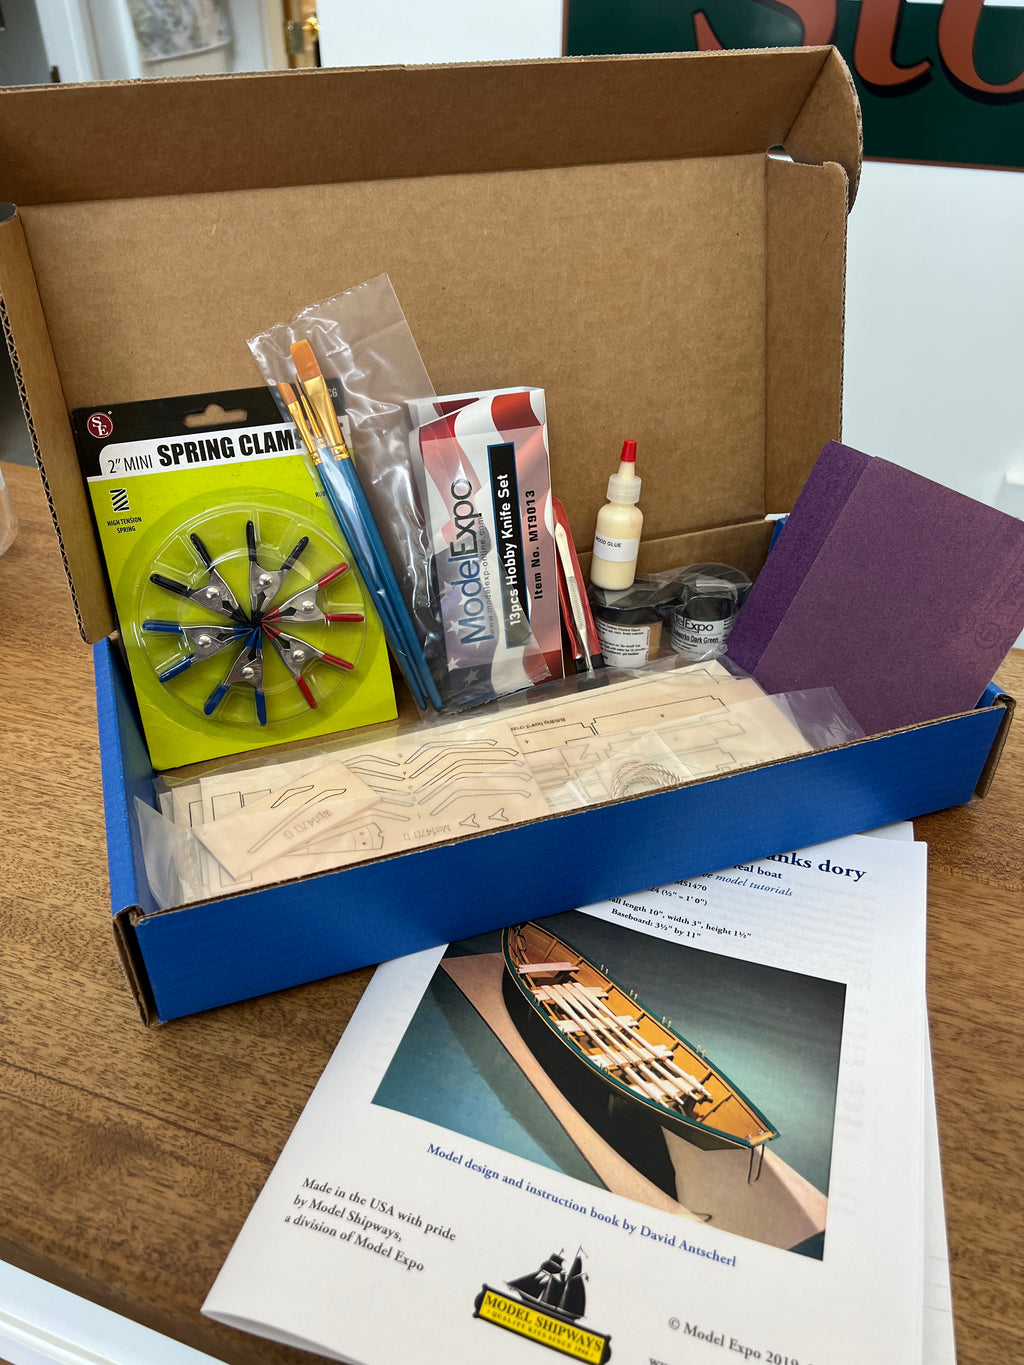
Everything for building this model is included.

For the novice, this Dory is the perfect introduction to model boat building. No previous knowledge is necessary. For the more experienced modeler, this is a fun and quick build that will leave you with a wonderful sense of accomplishment.

Kit features:
- Historically accurate, detailed wood model
- Plank-on-frame construction
- Laser cut basswood parts
- Detailed plans and 15 page illustrated instruction manual
-Wooden display base

Included with kit:
- Clamps
- Tweezers
- Hobby knife with blades
- Sandpaper
- Paint and brushes
- Glue
 

Scale: 1/2" =1' (1:24)
LOA: 10"
Beam: 3"
Height: 1 1/2"

Skill Level = 1

Skill levels are:
1 = beginner
2 = intermediate
3 = advanced

Customer Reviews

Based on 6 reviews
67%
(4)
33%
(2)
0%
(0)
0%
(0)
0%
(0)
C
Customer
Wonderful model

Have built wooden models before but particularly appreciated this model's instructions - a bit of mentoring is always a good idea and there were some new tricks that even a seasoned builder can learn and utilize afresh.

E
Edward Pesula
Dory

I was very impressed with how complete the kit kit is.

s
steve shea
i'm hooked

Really a fun build. So i ordered two more kits upping the difficulty. It's a great way to wind down after a day of skiing. I'm a Wyoming land lubber so maybe I'll lear enough to build the real thing one day.

W
Warren Brown
Great kit to start with

I love this kit. I am not an experienced model builder and this is a great kit to start with.

D
Don Fithian
Nearyly complete, just a few more details would help

The instructions and illustrations were really excellent, but I found a couple of details that could have been helpful if illustrated or pointed out. They are the following in the order in which I added notes to the instruction booklet: 1) The frames did not have markings for placing the risers. The risers come up in steo #15, but by then, I had already sanded the frames to be parallel with the planks, and there were no marks as described. So, look for the markers that are described in step #15 when you are working on step #4. 2) The illustration showing how to line up the transom in step #6 is helpful, but you need to keep doing that as you add the planks because the transom can become twisted, or the planks can bring out very minor twist or tilt in the transom. I had to loosen and re-glue the transom to all the planks after I reached step #12; I don't know if I could have avoided that if I had been checking as I added the planks, but it is good to be forewarned about this. 3) When you bevel the stem in step #7, don't go all the way to the building board: leave a little stem un-beveled till you know where the top of the sheer plank will be. That way your false stem won't have a gap when it is glued to the stem in step #13. 4) In step #12a, as in note 1 above, make sure that if there are marks on the inside edges of the frames for locating the risers, do not remove them. 5) The illustrations and instructions for step #13 don't make it clear, but the false stem should extend all the way from the boat's bottom to the top of the stem. 6) The illustrations for step #14 appear to show single supports that are rectangular in cross-section, but the package includes sticks that are square in cross-section, that are paired for creating each side cleat in order to create a cleat that is rectangular in cross-section. That could be more clearly explaine and illustrated.
Overall, this was a very satisfying and clearly described/illustrated build. I offer these thoughts only because they'd have been helpful for me.

Recently viewed